Friday, March 15, 2013

Just Had to Make It Harder ....

When using the Sunrise Feed Mill base (2 pieces) to position the industry track I made one discovery and had one crazy idea.

The discovery was that the foam pieces on Module 2 were not as level as I had originally thought.  There was a slight dip from the main section to the extension.  Of course, I had to fix that.  So I took out my Mold-a-Scene and mixed up a small batch and troweled it onto the uneven surface.  It was really crumbly, even after I added a tablespoon or so of extra water.  After working with it for a while I got it into the shape that I needed.


You can see some of the Mold-a-Scene under the base of the model after I sanded it down.

One thing I learned about Mold-a-Scene (that even my guys at the hobby shop couldn't be sure of) is that it will adhere to foam.  But it takes a long time to dry.  Five days.  Of course I'm building this in my garage and it's winter and it's the Northwest so it is cold and damp.  But 5 days?  Well, at least it dried and it sanded well.

Then the crazy idea hit.  Feed mills like this take delivery from bulk carriers, like a car-load of corn or something like that.  Then the corn is taken by the feed mill and ground and bagged.  So how do they get that corn or whatever?  Hoppers pull up and dump their load into a trough, which leads to the mill underground.

You can see the trough being cut out of the foam.  I used a small, flat-bladed wood cutting knife I had, taped up at a place above the point of the knife so that each incision I made would be the same depth.

I'm sure there's a company out there that makes a trough that I could use but I didn't want to go looking for it.  I wanted it right now.  So I built one on my own using plastic dock parts from Walther's foundation and loading dock parts kit.  The difficult part was cutting the narrow sides to the right length.  It seemed that in the prototype the rails would need to sit on the long edges of the trough in order to support the rails.  And as we know prototypical rails are 4-feet-eight-inches apart.  That's fairly narrow in N Scale.

You can see the the finished unpainted model in the photo above and below.


There's more to do on the trough ....

Thursday, March 14, 2013

Getting Serious

The framework sat for months without me doing much.  Then the bug bit.

In the photo below you'll notice that I've done several things, not the least of which is place the foam base and painted it.  You'll see that Modules 1 and 2 are painted.  Also, Modules 2 and 3 have picked up another extension.  This is the 8-inch extension discussed in the last entry.
Every journey begins with a single step.
And strangely enough, the width of this module equals the length of one of my steps.


I chose foam for a base, rather than the open-lattice-work style, because a fair amount of my layout is going to be relatively flat.  Hills and water features and rising mainline and even a planned-for mountain for a timber industry scene can be added by cutting into the foam, adding to it with more foam, or using the old newspaper and Hydrocal plaster-soaked paper towels, all to great effect.  In the end, the flat areas will be flat, but all around them will be rising and falling topography.  Maybe not perfectly prototypical, but good enough for me.

I decided to start modeling with Module 2.  I haven't done this kind of work in a while and need lots of practice before I head into the tougher modules (the town and the timbered mountain).  This module will give me practice on a lot of things like laying track, creating tunnels, building hills, working with water, and building roads.

You will see some spray foam filling some cracks between the 2-inch foam base on the main part of the module and the extension.  My hand is none to steady with the hot wire foam cutter. Remarkably, though, the foam between the modules is relatively level, allowing for less futzing around to get the tracks to line up when I power and run the whole layout.

This module will have two tracks converging into one and two turnouts for industries: a Feed Mill (the Sunrise Feed Mill kit from Walthers Cornerstone) and across the tracks a cattle pen and loading dock kitbashed from N Scale Architect's inaccurately designed model.  They use a tab-and-slot method for building the kit (which makes kitbashing difficult, even if it makes kit building easier), but their chute design is very different from most cattle pens of the era I'm looking to build and fixing it will take some doing and maybe some extra fence building.

Also, the piece of cardboard you see standing up between Modules 1 and 2 represents the ultimate placement of a hill that will rise on either side of the break (unconnected to each other so that each module can be moved independently) and will run front to back along the entire length of the modules.  These hills will only be about 4 inches high, but will provide a visual break between the wide-varying designs of each module.

This was a major step forward for me.  Actual track planning has been a goal for several years but has mostly existed in my head.  That I'm already starting to lock down the cork and track is a great victory for me.

Saturday, March 9, 2013

First Post - The Structure

The thing I learned from reading and looking at a lot of pikes, and then from starting my own twisted oval design, is that I didn't want to do that type of layout.  I wanted to do a Point-to-Point railroad.

The biggest advantage in this design is that you don't have to worry about what was for me the tricky electrical stuff.  All electrical is tricky for me, but with no loops wiring would be easier for me.

Also, I didn't want to build only a few structures in a town that would sit in the curve of a track that circled around to an industry that was oddly angled and ridiculously close to the town.  I wanted to spread out, use straighter lines, and make a town with twenty or more structures.

It became clear that I had to build it in my garage.  It's 19 feet by 20 feet, and that would give me a lot of room to work in.  In fact, the plan calls for a finished pike of 75 feet.  But because I had to be able to lift it up and away from regular garage stuff (like cars and ladders and shop vacs) I built it using my own variant of N-Trak.  Real N-Trak people would cringe at what I've done, but it's what I needed.

I built 32-inch wide modules, which was based on the stud spacing in my garage (16 inches on center).  I built cleats to the back of the boxes and wood rails on the wall in which the cleats would slide.  The box depth started at 24 inches and I realized almost immediately that I couldn't do what I wanted in that shallow of a space, even in N-Scale.  And there would be no way I could put in realistic curves.

So I built extensions onto the front of each module.  That gave me 30 inches of depth.  That would be perfect.  That is until Bachmann came out with their Peterbuilt streetcar.  To fit that and the track the car would need into my town I would need more depth.  So I added another 8-inch extension onto the town modules.  And then I needed to add extension to the modules on either side of the town so I could line up the track properly.

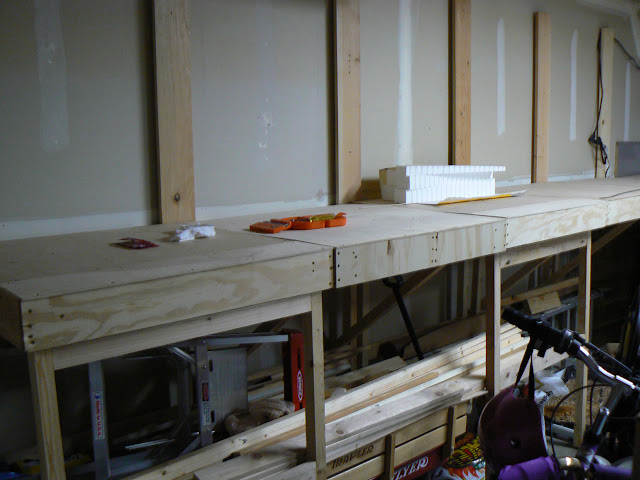
Below is a photo of the first set of modules.


These are modules 1 through 4.  Each now have the 8-inch extension (not shown in this photo).  Each module will lift up out of the way, and the legs detach (pretty much they just fall away).  You will note that module 2 and 4 do not have front legs.  I used an angled brace from back to front to support the module.  I needed to get to the store of wood (which you can see), and the dog had to get to his litter area (which you don't want to see).

Three other modules are now built.  Two of them would follow the 4th module and would create the perpendicular turn at the back of the garage.  The third module is attached to module 1 (I call it the zero module).  This one is 8 feet long and about 30 inches wide and will become a fairly good sized yard.

More later.