At the core of it, my layout is basically N-Trak. I've modified the N-Trak ideals to fit my needs, of course, and I'm sure N-Trak.org would be appalled with what I've done. But it fits my situation. With N-Trak, although you are creating separate dioramas that are put together to build a complete layout, you really have often wildly disconnected scenes. You can have a mountain in one module right next to another module that has an oceanside pier. Or a city that ends abruptly next to a farm. All of it is at the whim of the club members who choose their own module designs, and then the uncertainty of who will decide to attend which show.
I wasn't making all of this as part of a club; it's just for me. So I wanted to do something different with the transitions. Usually, N-Trak units have fiber board or hard board walls on the sides of their modules. These are painted with images that mesh with the module's design: low hills and blue skies for a farm module; a city-scape for a downtown layout. While this works, I don't really like it for my design. First, I'm no painter. I used an airbrush fairly well recently, but my artwork would be fit quite nicely in a second grade classroom. Second, I wanted to integrate the transitions into the scene a little more than N-Trak usually does.
My solution is to create low hills between the scenes. Each of these will reflect the geographic structure of the area I'm trying to depict, and will have unique features: water falls, rock formations, timbered hills, and the like. This might require a bit more work (especially with Hydrocal!), but I believe that visually it will be more pleasing.
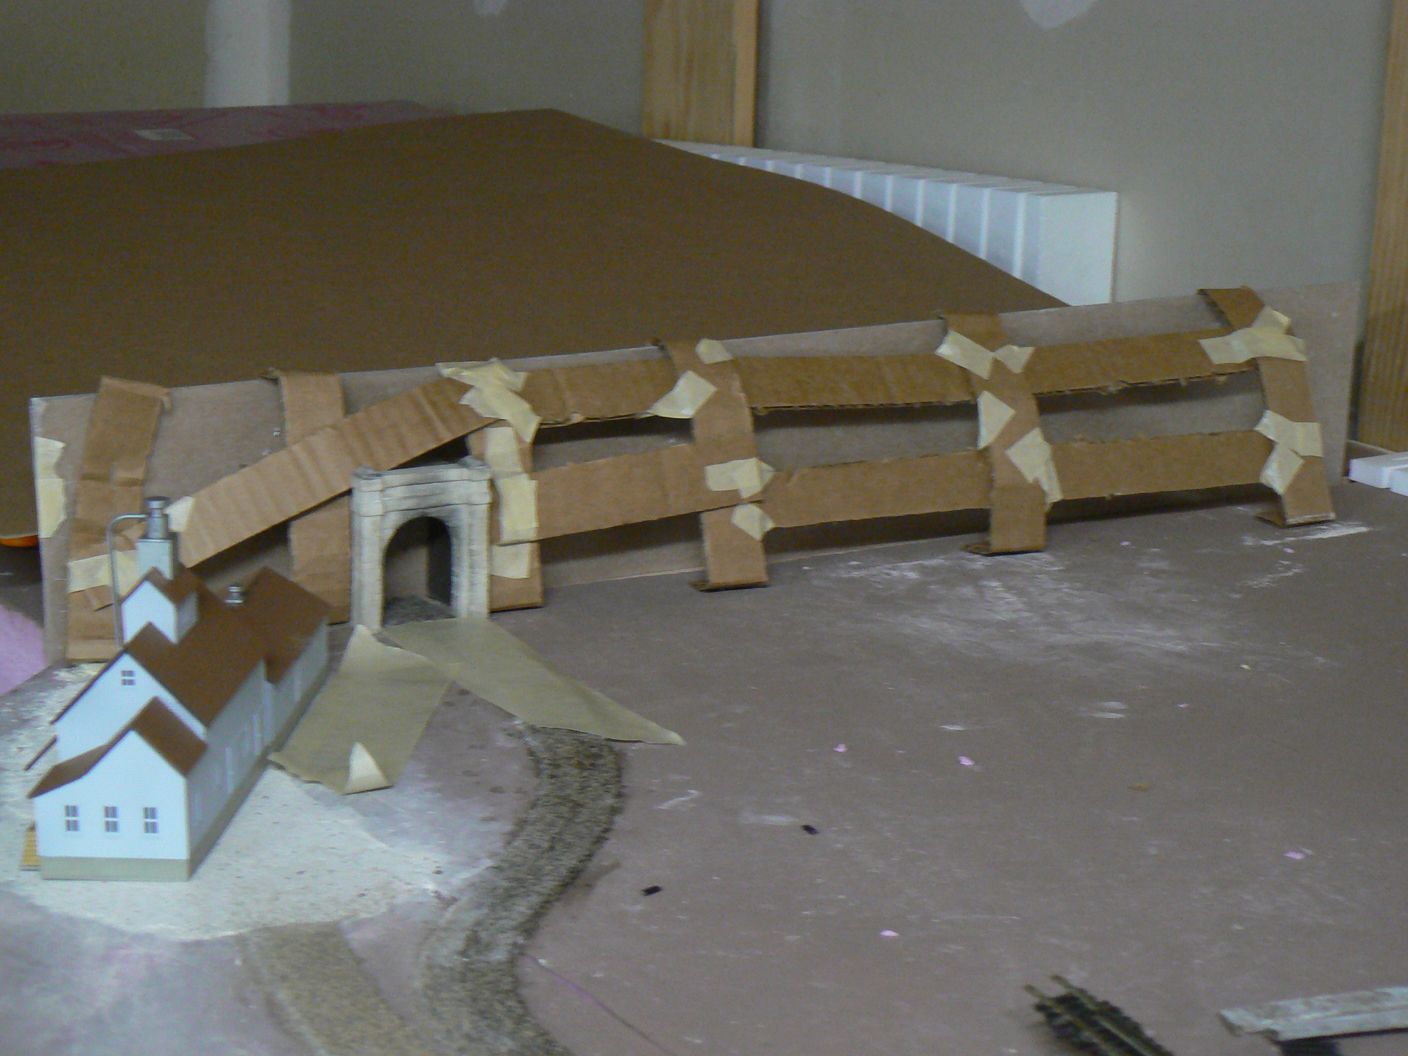
In the picture above you see the cardboard webbing that will support the Hydrocal-soaked paper towels to form the hill. This is the left side of Module 2. It's a ranching scene with cattle pens. There is also a highway (or what used to be called a highway before Eisenhower started up the super highway program in the '50s), a feed mill, and a mainline that breaks off into two tracks, along with two separate turnouts; one for the cattle pens and one for the feed mill. I'm going to have a farm road, too, that will cross the tracks to reach the highway.
The webbing is connected to a cardboard wall at the very left edge of the module that will be removed once the Hydrocal is dry and hard. Adding some degree of difficulty is the railroad tunnel that will provide access from this module to the next. This is a major point in the building of this layout. I've been thinking about creating this large layout in my garage for years. I've planned out most of it, right down to some of the smallest details. For many reasons I haven't been able to work on it very much, and when I could it took a lot of time to work out a number of problems and build the base. Gluing some cork or building and painting a model is one thing. This geographic structure -- to me, at least -- is something much bigger. It's a signal that I'm really going forward with the project. And that's a little scary.
You probably can see that I glued the cork roadbed. I did some sanding of the roadbed as it meets up with the Mold-a-Scene patch underneath the feed mill. I had to use a plastic shim (slightly sanded) to bridge the gap between the end of the sanded cork and the beginning of the trough (which is covered by the wide piece of masking tape.
Another bit of detailing I did was with the tunnel entrance. I wanted it to retain it's stone look and texture while giving it an old, dirty look. This is a portal I've had for a while, and over the years it accumulated a lot of dust and dirt. That was good. But I needed to give it a light stoney gray color. After some fits and starts, I decided to color some water with about half a teaspoon of stone coloring from Woodland Scenics and then soak the portal for a few minutes. The end result wasn't bad, maybe not as dark as I would have liked. Guess I needed some more of the stone coloring. To fix this I used some chalks to color parts of the portal to give it a sooty look, as if years of steam engine passage had darkened portions of the arch. This picture may not be the best representation of it. I haven't figured out how to manage the macro setting with aperture control.
Next, I raise mountains ....
Showing posts with label Garage. Show all posts
Sunday, April 7, 2013
Saturday, March 9, 2013
First Post - The Structure
The thing I learned from reading and looking at a lot of pikes, and then from starting my own twisted oval design, is that I didn't want to do that type of layout. I wanted to do a Point-to-Point railroad.
The biggest advantage in this design is that you don't have to worry about what was for me the tricky electrical stuff. All electrical is tricky for me, but with no loops wiring would be easier for me.
Also, I didn't want to build only a few structures in a town that would sit in the curve of a track that circled around to an industry that was oddly angled and ridiculously close to the town. I wanted to spread out, use straighter lines, and make a town with twenty or more structures.
It became clear that I had to build it in my garage. It's 19 feet by 20 feet, and that would give me a lot of room to work in. In fact, the plan calls for a finished pike of 75 feet. But because I had to be able to lift it up and away from regular garage stuff (like cars and ladders and shop vacs) I built it using my own variant of N-Trak. Real N-Trak people would cringe at what I've done, but it's what I needed.
I built 32-inch wide modules, which was based on the stud spacing in my garage (16 inches on center). I built cleats to the back of the boxes and wood rails on the wall in which the cleats would slide. The box depth started at 24 inches and I realized almost immediately that I couldn't do what I wanted in that shallow of a space, even in N-Scale. And there would be no way I could put in realistic curves.
So I built extensions onto the front of each module. That gave me 30 inches of depth. That would be perfect. That is until Bachmann came out with their Peterbuilt streetcar. To fit that and the track the car would need into my town I would need more depth. So I added another 8-inch extension onto the town modules. And then I needed to add extension to the modules on either side of the town so I could line up the track properly.
Below is a photo of the first set of modules.
These are modules 1 through 4. Each now have the 8-inch extension (not shown in this photo). Each module will lift up out of the way, and the legs detach (pretty much they just fall away). You will note that module 2 and 4 do not have front legs. I used an angled brace from back to front to support the module. I needed to get to the store of wood (which you can see), and the dog had to get to his litter area (which you don't want to see).
Three other modules are now built. Two of them would follow the 4th module and would create the perpendicular turn at the back of the garage. The third module is attached to module 1 (I call it the zero module). This one is 8 feet long and about 30 inches wide and will become a fairly good sized yard.
More later.
The biggest advantage in this design is that you don't have to worry about what was for me the tricky electrical stuff. All electrical is tricky for me, but with no loops wiring would be easier for me.
Also, I didn't want to build only a few structures in a town that would sit in the curve of a track that circled around to an industry that was oddly angled and ridiculously close to the town. I wanted to spread out, use straighter lines, and make a town with twenty or more structures.
It became clear that I had to build it in my garage. It's 19 feet by 20 feet, and that would give me a lot of room to work in. In fact, the plan calls for a finished pike of 75 feet. But because I had to be able to lift it up and away from regular garage stuff (like cars and ladders and shop vacs) I built it using my own variant of N-Trak. Real N-Trak people would cringe at what I've done, but it's what I needed.
I built 32-inch wide modules, which was based on the stud spacing in my garage (16 inches on center). I built cleats to the back of the boxes and wood rails on the wall in which the cleats would slide. The box depth started at 24 inches and I realized almost immediately that I couldn't do what I wanted in that shallow of a space, even in N-Scale. And there would be no way I could put in realistic curves.
So I built extensions onto the front of each module. That gave me 30 inches of depth. That would be perfect. That is until Bachmann came out with their Peterbuilt streetcar. To fit that and the track the car would need into my town I would need more depth. So I added another 8-inch extension onto the town modules. And then I needed to add extension to the modules on either side of the town so I could line up the track properly.
Below is a photo of the first set of modules.
These are modules 1 through 4. Each now have the 8-inch extension (not shown in this photo). Each module will lift up out of the way, and the legs detach (pretty much they just fall away). You will note that module 2 and 4 do not have front legs. I used an angled brace from back to front to support the module. I needed to get to the store of wood (which you can see), and the dog had to get to his litter area (which you don't want to see).
Three other modules are now built. Two of them would follow the 4th module and would create the perpendicular turn at the back of the garage. The third module is attached to module 1 (I call it the zero module). This one is 8 feet long and about 30 inches wide and will become a fairly good sized yard.
More later.
Subscribe to:
Posts (Atom)

